A substantially updated version of the hypertextbook is available here. Please migrate to that version. This one will eventually disappear.
Collecting Soil Biofilms by the Buried Slide Technique
Introduction
This exercise describes a method for collecting soil
biofilms on glass slides through direct contact between soil
and microscope slide, in the field or in the laboratory.
This technique is described in “Methods for Studying the
Ecology of Soil Micro-organisms” (Parkinson et al.1971).
In this exercise a microscope slide is placed in contact with
soil. Organisms representative of the soil population will form
a biofilm on the slide. Parkinson (1971) cautions not to assume
that the microbial population observed on the glass slide is
similar to that of the undisturbed soil. The glass slide alters
the dynamics of the soil ecosystem by providing a new and novel
substrate. The organisms that colonize the slide can be assumed
to be soil microorganisms, but the proportion, distribution and
relationships of the organisms may be drastically
altered.
Supplies Needed:
Materials
|
Quantity |
Description |
| As Necessary | 1 x 3 inch glass microscope slides, cleaned and sterile |
| As Necessary | Staining kits |
Equipment
|
Quantity |
Description |
| 1 | sterile forceps |
| 1 | long bladed spatula or knife |
| 1 | microscope |
| 1 | clay or plastic flowerpot or a plastic cup |
Instructions
- Clean the microscope slides with acid alcohol and heat
sterilize them in a Bunsen burner flame or wrap them in
aluminum foil and sterilize them by autoclaving.
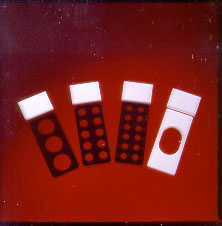
Note: To enumerate the cells collected from soil, use preprinted slides such as those available from Erie Scientific Co. These slides have circular areas of known surface area (πr2 ) (Figure 1).
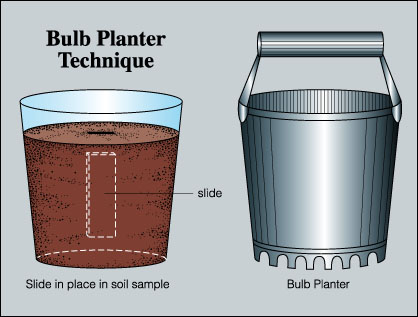
- Choose an inconspicuous site for placing the microscope slides so that they will not be intentionally or inadvertently disturbed. Alternatively, bring a soil into the laboratory by using a garden bulb planter (Figure 2). Select a soil sampling site, then twist the bulb planter into the soil to remove a soil core. Place this core into a clay pot, plastic pot or a plastic cup of appropriate size. If a plastic cup is used, be sure to punch some holes in the bottom of the cup to permit water drainage (unless, of course, there is interest in sampling biofilms from waterlogged and anaerobic soil).
- With a sterile knife or spatula, make a slit in the soil core sample (dip knife or spatula blade in alcohol and flame). Widen the slit by moving the knife from side to side.
- Carefully insert one or more sterile slides into the slit using sterile forceps.
- Firm the soil up around the slide to ensure that the soil is in close contact with the slide. Then lightly water the soil.
- Cover the pot or cup with a Petri dish lid or plastic wrap and label it. If this exercise is being carried out in the field, mark the site inconspicuously so as not to attract unwanted attention.
- The slides should remain in place for 1 - 3 weeks, after which the slides may be removed from the soil. This is best done by removing the soil core from its container and carefully breaking the soil away from the slide.
- Wipe one side of each slide clean with a paper towel.
- The slide may now be stained for observation under the microscope. The “Flow Through Gram Stain” described elsewhere in this collection, or any of a number of stains can be used for visualizing the soil biofilms. Ruthenium red and Alcian blue are recommended for staining extracellular polysaccharides.
Classical simple and differential stains such as Crystal violet, Gram stain and spore stain may be used on these slides.
Note: Since biofilms are 98% water, staining without heat fixation is preferred. Heat fixation usually employed to attach cells to the slide, dehydrates the biofilm so that its structure is greatly altered.
Observations:
- View the slide under high dry or oil immersion microscopy.
- Can you distinguish the biofilm cells and matrix from the inorganic soil components which may be adhering to the slide?
- Is it possible to see the matrix material in which the cells are embedded?
- Is there any discernable organization to the biofilm on the slide? Are the cells uniformly distributed or are they clustered in microcolonies?
- Is there any evidence of channels within the biofilm?
- Is there any association between the organic and inorganic components of the biofilm?
Questions:
- In viewing the stained or unstained slide under the microscope, how do you know a biofilm is present?
- Why is the biofilm on the slide not necessarily representative of the biofilm in the soil?
References
Microorganisms in surface films from soil crumbs
Harris PJ
Soil Biol Biochem 1972; 4:105-106
Methods for Studying the Ecology of Soil Micro-organisms
in Parkinson D, Gray TRG, Williams ST (eds.)
Blackwell Scientific Publications, Oxford, 1971, pp 30-31
This material is based upon work supported by the National Science Foundation under Grant No. 0618744, and in part by the Waksman Foundation for Microbiology. Developed in collaboration with Dr. John Lennox, Penn State Altoona. Any opinions, findings, and conclusions or recommendations expressed in this material are those of the author(s) and do not necessarily reflect the views of the National Science Foundation.
©2002-2008 Center for Biofilm Engineering, http://www.biofilm.montana.edu