Flow Through Gram Stain - Inustructions for Students
A substantially updated version of the hypertextbook is available here. Please migrate to that version. This one will eventually disappear.
Copyright © Alfred B. Cunningham, John E. Lennox, and Rockford J. Ross, Eds. 2001-2008
Flow Through Gram Stain
Introduction:
The Gram stain devised by Christian Gram in 1882 has become one of the most important diagnostic procedures in microbiology. This stain differentiates two main categories of bacteria according to the structure of the cell wall. Bacteria with a predominantly peptidoglycan cell wall stain blue/purple with this technique and since they retain the primary stain are called Gram positive (Gram +). Cells with only a minor peptidoglycan component and possessing a lipopolysaccharide cell wall give up the primary stain during destaining and therefore exhibit the red counter stain. These cells are called Gram negative (Gram -).A Gram stain is usually performed on a smear preparation that has been heat fixed. One function of fixation is to secure (fix) the cells to the slide. In a biofilm, however, the cells are already fixed. Furthermore, a heat fixed slide is dry, but a biofilm is mostly water. Drying alters the biofilm virtually beyond recognition. This exercise describes a method for obtaining a Gram stain on a minimally altered biofilm.
Safety Note:
It is recommended that you wear a lab coat or an apron to protect your clothes from staining and gloves to protect your hands. Also, wash your hands thoroughly before leaving the lab since you are working with bacteria.Supplies Needed:
|
Quantity |
Description |
| 1 | biofilm grown on a 1 x 3 inch microscope slide |
| As Necessary | 25 mm square coverslip (the thinner the better) |
| As Necessary | petroleum jelly |
| As Necessary | paper towels |
| 1 | Gram Stain Kit (Hucker’s Crystal violet, Gram’s Iodine, Decolorizer, Safranin) |
Instructions:
Prepare a biofilm slide by any appropriate method
- One could use one of the methods described in Biofilms:
The Hypertextbook
.
- Perhaps the simplest method is to simply site a clean 1
x 3 inch microscope slide at some site likely to produce a
biofilm, for example a stream, pond, seep, wharf, shower,
drain or aquarium. Any site where a slide can be submerged
in water will serve. Flowing water is preferable.
Preparing the slide for flow-through staining
- Wipe one side of the biofilm slide clean with a paper
towel.
- On the remaining biofilm side of the slide, wipe the
top and bottom 2 mm of the slide clean (see Figure
1).
- Thinly spread petroleum jelly on a sheet of paper. Hold
a cover slip at right angles to the petroleum jelly and
scrape it in such a way as to build up a thin ridge along
one edge of the cover slip. The procedure is similar to
preparing a coverslip for a hanging drop mount.
- Repeat the process with the opposite edge of the cover slip.
- Carefully place the cover slip onto the biofilm slide preparation petroleum jelly side down so that the jelly is in contact with the 2 mm clean edges. This has the effect of producing a tunnel between the coverslip and the slide.
Preparing the Gram stain
The Gram stain reagents are added at one open end of the slide “tunnel” and are drawn through the space under the slide by means of an absorbent paper towel. The reagent sequence is identical to that in the standard Gram stain but the time intervals are longer to compensate for any dilution effect caused by the aqueous phase of the biofilm preparation. It is important to be certain that sufficient reagent has been drawn under the coverslip so that dilution by the volume of water present or by the previous reagent is minimized.The bacteria stain as in a traditional Gram stain, but because of the thickness of the preparation and the presence of water the slides do look different from a typical Gram stain. For example, the colors are typically more muted.
- Add the Crystal Violet dye to one edge of the coverslip “tunnel.” Draw the dye through using an absorbant paper towel applied to the opposite edge of the cover slip. Draw the dye through until all the water has been replaced by dye. Stain for 30 seconds.
- In a similar manner, wash the slide by drawing water under the coverslip with a paper towel until no further purple color is removed.
- Add the Gram's Iodine solution by adding several drops of the reagent to the same edge of the coverslip and drawing it through with a paper towel. Treat for about 1.5 minutes.
- Decolorize the slide by drawing 95% alcohol under the coverslip until no further purple due is removed.
- Wash the slide as in step b.
- Counter stain the slide by placing Safranin dye at the same end of the “tunnel” and drawing it through with a paper towel. Stain for 1/2 minute.
- Wash the slide as in step b.
- Observe the slide under high dry or oil immersion microscopy. Note: The thickness of the preparation may preclude an examination under oil immersion See Figure 1, which illustrates this modified Gram staining method.
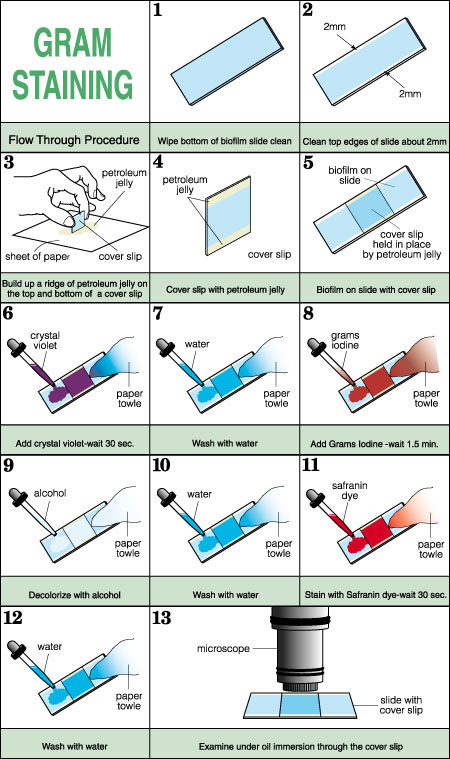
Figure 1. Gram staining method.
Questions:
- Why was heat fixing of this slide not recommended?
- What is the major component of a biofilm?
- Typically, the color intensity of a Flow Through Gram Stain is not as intense as in a Gram Stain done by the standard method. What might account for this difference?
Assessment:
Your instructor may assess this exercise by examining your prepared biofilm Gram stain. Take the opportunity to examine flow-through Gram stain preparations made by other students. Does the type of biofilm influence the quality of the Gram stain preparation?
This material is based upon work supported by the National Science Foundation under Grant No. 0618744, and in part by the Waksman Foundation for Microbiology. Developed in collaboration with Dr. John Lennox, Penn State Altoona. Any opinions, findings, and conclusions or recommendations expressed in this material are those of the author(s) and do not necessarily reflect the views of the National Science Foundation.
©2002-2008 Center for Biofilm Engineering, http://www.biofilm.montana.edu