Isolation of Biofilm Populations from Soil Crumbs by Flotation - Instructions for Students
A substantially updated version of the hypertextbook is available here. Please migrate to that version. This one will eventually disappear.
1
Copyright © Alfred B. Cunningham, John E. Lennox, and Rockford J. Ross, Eds. 2001-2008
Isolation of Biofilm Populations from Soil Crumbs by Flotation
Supplies Needed:
|
Quantity |
Description |
| 1 | Pair tweezers |
| 4 | Pasteur pipet |
| 1 | Gram Staining Kit and or Spore staining kit per two students |
| 1 | Micropore filter funnel with sintered glass bottom (without the membrane filter) OR a wide mouth Buchner funnel with a sintered glass bottom |
| 1 | Tygon or other flexible tubing to connect Buchner and separatory funnels (approx 40 cm) |
| 2 | ring stands and rings |
| 1 | 500 ml separatory funnel |
| 1 | clean cover slip or microscope slide |
| 1 | clamp to secure the base of the funnel |
| As Necessary | Multiple samples of well drained soil from various locations, garden soil, compost, forest soil, desert sand, greenhouse soil. |
Instructions:
- Assemble apparatus as shown in the diagram (from Grossman and Lynn, 1967)
- In order to remove air bubbles from the system: Fill the separatory funnel with about 300 ml of distilled water. Remove the ground glass stopper from the separatory funnel.
- Raise the separatory funnel and open the stopcock. The water should fill the reservoir of the funnel and rise through the sintered glass bottom of the micropore filter.
- Lower the separatory funnel until the water is just below the surface of the sintered glass base of the micropore filter.
- Weigh a soil crumb of between 0.01 and 0.5 grams (Harris, 1971) and with forceps place it carefully on the sintered glass base of the micropore filter.
- Slowly raise the water through the soil crumb by elevating the separatory funnel. An observable film should form on the surface of the water. The size of the film roughly corresponds to the size of the soil crumb. Do not disturb the funnel, as any agitation of the water layer is likely to break up the film.
- Collect the sample biofilm on a cover slip, by inserting the coverslip into the water next to the biofilm. Move the coverslip so that it is under the film and then slowly raise the coverslip. The biofilm will usually adhere to the coverslip. Adherance can be facilitated by using a Pasteur pipet to move the film into contact with the coverslip.
- Allow the coverslip and biofilm to air dry.
- Heat fix the film and stain with your choice of techniques. Gram stain and spore stains work well as do methylene blue or crystal violet dye simple stains.
- Affix the cover slip to a slide using a tiny drop of clear nail polish applied at the corners.
- Observe under oil immersion.
Observations:
- Is it possible to count the cells you observe within the drop?
- Describe the diversity of the cell types you observe.
- Compare your biofilm sample with those isolated from different soil types and locations.
- If possible, estimate the number of bacteria obtained per mass of the soil crumb you used.
- Is your soil crumb still intact? If so attempt to isolate sequential biofilms from the same soil crumb. What happens to the number of cells in sequential biofilm samples? Plot the cell number against the number of biofilm samples isolated from a given soil crumb. How efficient is this technique in recovering bacteria attached to the soil matrix surface?
Cells/gram of soil =
Illustrations:
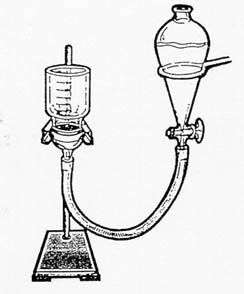
Figure 1. Filter setup illustrated by Marcus
Sellers.
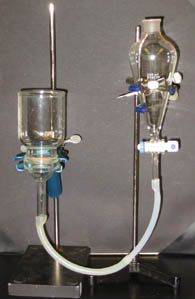
Figure 2. Picture of filter setup in the lab. Photo
Credit: D. Williams
Acknowledgments:
This exercise was developed at Penn State Altoona College, as a student generated independent study project and was contributed by Marcus Bryan Sellers.Educational Program Curricula and Teaching Resources
Supported in part by the Waksman Foundation for MicrobiologyDeveloped in collaboration with Dr. John Lennox, Penn State University-Altoona
©1999-2008 Center for Biofilm Engineering, http://www.biofilm.montana.edu